Monday 13 August 2012

(Dis)assembly

There's been some good news and some bad news: the bad is that I have not had and will continue not to have enough time to work alone on the oktokopter project, and the good is that a team of robotics students and engineers at Arizona State University have volunteered to continue the work. We are shipping the 'kopter overseas, disassembled so as to pack well for the trip. To help the ASU team (and anyone in future working on this project!) here's an overview of how to put the 'kopter back together.

Remove the propellers: use an 8mm hexagonal spanner to undo the self-locking nuts. There is a black washer between each nut and propeller.


Note that the propellers are on in alternating clockwise and clockwise configurations: the red (port) spar  is shown below with the correct propeller so you can put them back on correctly. If you get them all wrong, the copter won't take off, but push itself into the ground!


After removing the clear plastic hood and putting the cottle pins somewhere safe, undo all of the black bolts with an allen key or ball screw, holding on to the 3.5mm nut at the bottom each time with either your fingers or a small spanner. (These bolts hold the strut saddles in place around the frame.) Put the black bolts and nuts together in once place.

Undo the silver bolts: these not only hold half of a strut saddle each, but also hold the platform onto the landing gear frame. As such they are slightly longer than the black bolts.
This is a view of the connection between the platform at the landing gear, before disassembly. Note that the platform touches the clear plastic frame directly, and then the load is distributed with a carbon fibre insert. This falls out when the silver bolts are removed.
After the platform is removed, the struts can be rotated around so that the starboard and port struts join the  front struts, and the remaining struts fold back with the rear struts.
All the cables connecting the landing gear to the platform have to be disconnected so here is a photo record of the connections:

We have since extended the camera mount lead since the
one that came with the 'kopter was not long enough.


Tuesday 6 March 2012

Vario Height Control

On the last flight I had the throttle set at just over the neutral position, which led to the 'copter making an ascent to 50m instead of performing its waypoints at 15m. I wanted to double-check that I fully understand the altitude controls so I thought I'd write down a bit of research.

There are three kinds of altitude control settings for the MK: manual, Height Limitation Control , and Vario Altitude Control.  From the 0.84 Firmware documentation, I find that the altitude control for waypoints "works only in vario-mode of the hight control. The gas-stick must be in the hoovering hovering position in that case." So comparing our two main modes:

With Vario OFF (manual mode ON):

  • throttle neutral -> propeller speed is at some level -> 'copter may ascend or descend depending on relative power of propellers against the air
  • throttle up -> propeller speed increases -> 'copter ascends
  • throttle down -> propeller speed decreases -> 'copter descends

with Vario ON (manual mode OFF)

  • throttle neutral -> 'copter remains at the height it is at
  • throttle up -> 'copter told to go higher -> it increases its own propeller speeds and ascends
  • throttle down -> 'copter told to go lower -> it decreases its own propeller speeds and descends

When switching between Vario mode ON and OFF, it's best to have the throttle at neutral. Otherwise it can gain or lose altitude unexpectedly. I found a video with a little demo on a quadkopter.

According to the 0.86 Firmware documentation, I can get more info from the HOTT transmitter screen:

Vario - symbol
This shows the setpoint of the altitude control. (vario mode only)
= : no change in altitude
+ : increase altitude
- : decrease altitude
^ : increase (command from NC: (Waypoint))
v : decrease (command from NC: (Waypoint))
The background of the symbol is black, if the altitude control is activated.

I've tried to find the relevant screens on the transmitter with the 'copter switched on and calibrated, but not flying, and so far I can't find anything like the screens described. So on another still day, I should take it up a bit, put it in PH/AH and see if I can find the telemetry data described.

Thursday 1 March 2012

Waypoint Tests

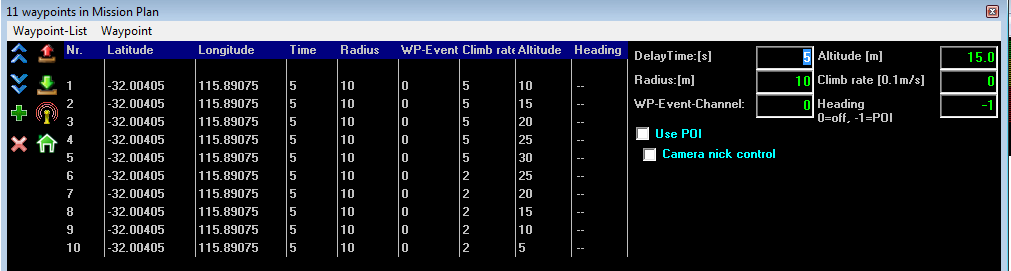
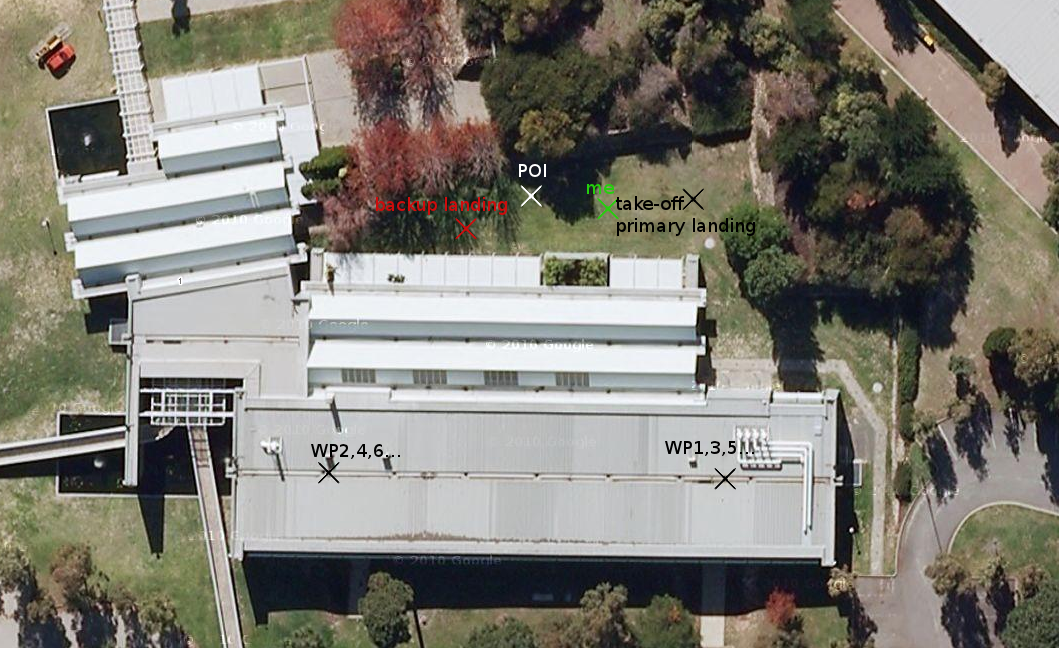
The plan today was to test two things: altitude control and curved vs. straight flight paths. I planned four sets of waypoints:

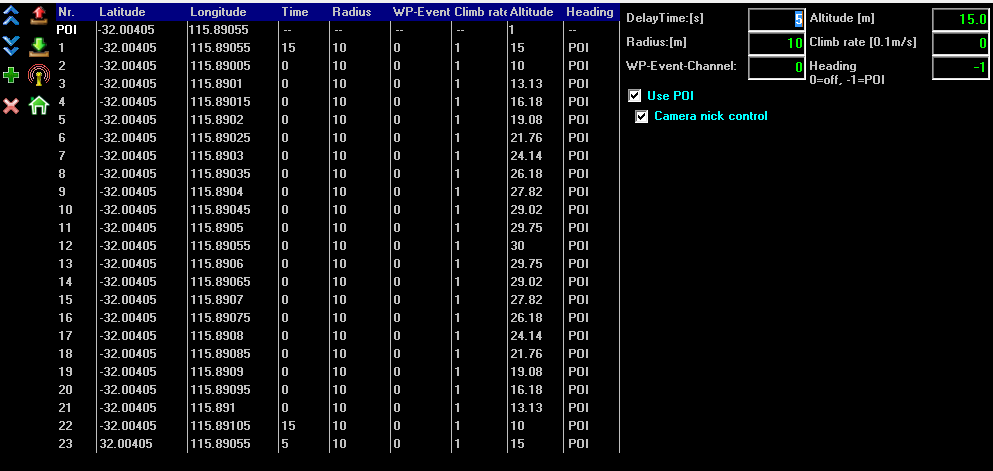
  • Vertical ascent at point A in steps of 5m, with 5s delays in between each waypoint, up to a height of 20m
  • Vertical ascent at point A in steps of 5m, with no delays, up to a height of 20m
  • Curved flight from B to C, pointing at POI
  • Straight flyover from B to C, pointing at POI

The temperature was 30C and the wind was moderate and steady: 16 knots, SE. It was mostly sunny.


Flight 1 - Vertical ascent with delays @ A

Start 14:47:48
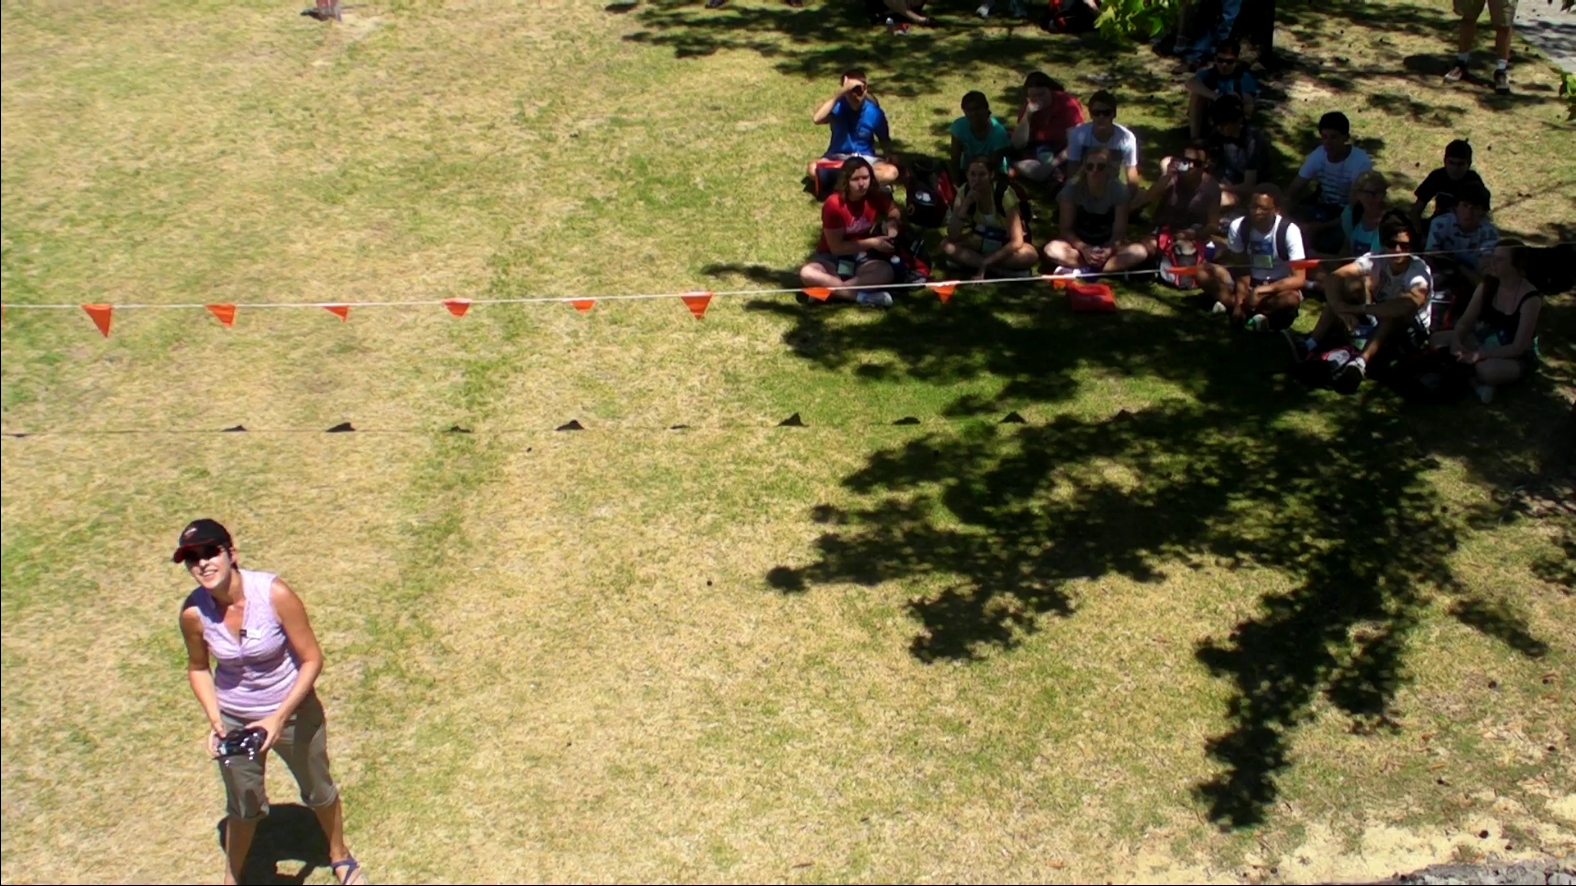
I started the 'copter a little south of location B, while I stood slightly further to the south. I performed the pre-flight checks, started the motors and sent it up a few meters, then engaged waypoint mode. As it moved to point A, I also moved to the 'me' location. It ascended in altitude steps but seemed to take a long time to do each step. Brought it down nicely.
End 14:49:53

I decided not to perform the vertical ascent without delays until I could ascertain whether the first programmed flight corresponded well to the measured flight, from the logs.

Flight 2 - Curved flight path B -> C
Start 14:59:34
I was at the 'me' location and the 'copter was at point A. I performed the pre-flight checks, started the motors and sent it up a few meters, then engaged waypoint mode. It moved smoothly to B, but the next waypoint steps were not smooth, and it took a long time to move over the flight path, even with no delays set. Not as bad as with 7 propellers but still need to come up with better Radius/PID settings. I aborted the flight about 20m East of point B and brought it down safely.
End 15:02:35


Flight 3 - Straight flyover B->C
Start 15:09:03
I was at the 'me' location and the 'copter was at point A. I performed the pre-flight checks, started the motors and sent it up a few meters, then engaged waypoint mode. It moved smoothly to B, but kept ascending once it was there, up to an estimated height of 50 meters. I realised I had the throttle at 55% instead of 50% so it just went up-and-up, until I realised, reduced the throttle, and brought it down. It was supposed to fly over at 15m altitude, but it did not begin its waypoint until about 5m. As it was so close to the ground, I set it to PH/AH and brought it down instead.  I need to check logs to find out how high it thought it was when it started to execute the waypoint.
End 15:10:55

Results
The first interesting result is that the 'copter does not appear to log until waypoint mode is engaged. Thus some flight logs, such as the first flight, do not have data points until 9m altitude, the point at which I engaged the waypoint mode.

Flight 1
It's hard to measure the time spent at each altitude as the 'copter doesn't seem to be able to stay exactly at the right altitude. It also didn't reach 30m. It's possible that because I have 'radius' set to 10m, the 'copter thinks that when I tell it to climb to 15m or 20m, and it is already at 10m, it thinks it is close enough, and doesn't bother to climb until the 25m waypoint kicks in. Then it ascends to 25m, reads the 30m waypoint, but thinks it's close enough, so just hovers for 15 seconds. For some reason it then descends to 20m and pauses there. So 5m increments may simply be too fine for the 'copter to manage.

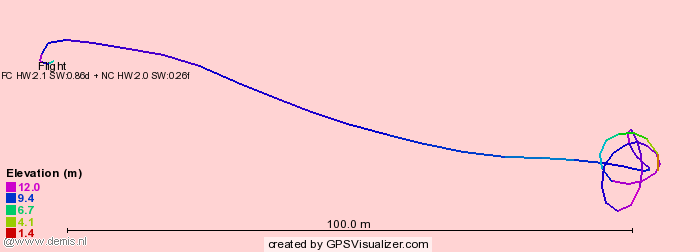
One might also guess from the birds-eye projection of this flight that the x,y position r.m.s. is around 8m. But taking the standard deviation of the logged latitudes and longitudes shows that the r.m.s. is more like 2.3m, which is a good measurement to have made. This would be excellent to measure again on a cool, still day.

I also made a histogram of the position offsets in latitude and longitude. The average of the longitude position offsets was 0.3m (east) and the average of the latitude position offsets was 1.4m (north). This suggests that the wind was probably blowing more from the south at altitude, pushing the 'copter slightly to the north.

Flight 2
Looking at the flight log, the 'copter took about 25 seconds to 'find' a waypoint to sufficient accuracy, which was usually between 5-10m away from the right position. The strong breeze no doubt made it more difficult - it would be informative to run the same test on a very still day. It may also be useful to set the allowable 'Radius' to 20m, to see if the 'copter spends less time trying to get to the waypoint, even if it doesn't get the waypoint exactly right.

Flight 3
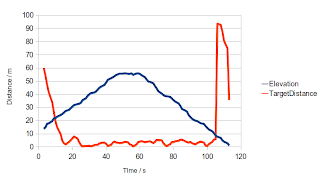
There is a "TargetDistance" column in the GPX file, which I think refers to the distance away from the next waypoint. From the previous flights I couldn't tell if it took into account altitude, but from this flightlog, one can see the TargetDistance staying low, even as the altitude significantly deviates from the expected waypoint. This is another argument in favour of performing straight flyovers, since if we keep the elevation steady, then we correctly log how far away the next target is.

The point at which the TargetDistance suddenly increases is when the 'copter reaches the radius of Waypoint B, and then decides it needs to move to Waypoint C. This is at just 8m altitude, and the 'copter was still descending, and when the 'copter does a course-correction it usually does drop slightly as it changes power in its motors. The elevation it was supposed to use was 15m, but 8m is only 7m less than this, and the allowed radius was 10m, so actually this scary-looking behaviour was fairly reasonable.

In terms of getting more reliable altitude behaviour, I need to read up the documentation, and get a bit better at judging heights rather than relying entirely on autopilot. The 'copter tripled its height before I decided to bring it down again; it should have been clear after 20 seconds that something was wrong. It's also probably a good idea to test the straight flyover at a higher altitude than 15m if I continue to use a radius of 10m for the waypoints, since that gives us only a minimum of 5m clearance above the ground. 20-30m would be safer, and more similar to actual field conditions of 100m.

Overall
I thought from a previous comparison of the logs that the KML files contain a log every second, and that the GPX files contain a log every 2.5 seconds. However I found this time that there was some jitter around these numbers. I can't tell which one is 'off' because the GPX files only contain the time to the nearest second, and the KML files have no time logged at all. It's hard to get sub-second accuracy using any other equipment such as a stopwatch, due to human reaction time. What might be a good idea is to set the KML logging to say, 10 seconds, and the GPX logging to 1 second, and see if I get a good GPX log every second.

Overall, the camera tilt seemed too high - the servo adjustments I made appear to have gone too far. I need to set up a waypoint on the ground, and go to several different altitudes at the same point, and see if the camera still points in the correct direction. If not, I should adjust the servo settings again. It might be possible to do this in the lab just by picking it up and tilting it - something to hold it in place would be useful.

One thing that would make flight set-up easier would be to have some device to find out where the POI is. The car GPS was too low-accuracy. Maybe I should simply have a first-flight program which simply flies to the POI to be used for the rest of the flights.


Further Flights
  • On a still day:
    • Measure r.m.s. position accuracy by hovering or moving between vertical waypoints;
    • Run the curved flight path with lower and higher radii;
  • On any day:
    • Mess with the altitude controls and see if I can get 5m precision;
    • Get the servo mount settings correct by ascending to a series of known altitudes and check the pointing via a video camera;
    • Run the straight flyover with waypoints at at least a height of (Radius + 10) m to allow for the 'copter's uncertainty in altitude;
    • Change the logging settings:
      • Reduce the KML to intermittent and see if GPX logging is more frequent;
      • Reduce both to prime intervals (e.g. 3, 5) so that they don't overlap frequently and see if they are more consistent.

Thursday 2 February 2012

Heading and Altitude Test

Plan
The plan today was to test a series of waypoints with different headings. I hoped to program the 'copter to fly between two points, pointing in a different direction each time. This would help with aerial photography, as I could then choose where I want to point the camera. It would also give me a feel for how accurate the compass is, if I pick cardinal points with clear landmarks.


Flight Log

I carried out two separate flights, both attempting to execute the above plan. Weather was perfectly still, 100% humidity, and about 30C.

Flight start: 11.46am
I accidentally had 'home' engaged during take-off. I flipped back to 'manual', and then to 'home' again, hoping to execute the waypoints. The 'copter flew to its first waypoint but hovered there without moving. Later, in the video, I found that it was pointing at the POI, rather than North, as I expected. I had programmed in a heading of '00' but apparently this causes it to use the POI rather than point at zero degrees - useful to know!

I set the 'copter back to PH/AH and flew it back to the point at which I had taken off. While moving it back, I found that Carefree mode made it actually more difficult to control. Perhaps I had moved from my starting point, or because it had moved to a 90degree angle to my starting point, the controls were not quite as I expected. In any case, I returned it to full manual mode, brought it back over the landing point and landed it very safely and gently,
Flight end: 11.48am

Flight start: 11.53am
The next flight, I was determined to execute the waypoint pattern and perhaps was not as thorough with my pre-flight check as I should have been. This time, I correctly set the switches on the controller ('manual', 'carefree on'), but I forgot to check the tightness of the nuts on the propellors. I also did not review the video of the last attempt, assuming that the reason it did not execute further waypoints was my mistake in starting with waypoint mode already on, but I should have realised that in that case it would have returned to the landing point, as that was the last waypoint on the list.

I calibrated, started the engines, and smoothly took off, then engaged waypoint mode again. The 'copter flew to its first waypoint but again hovered for a good twenty seconds without moving on to the next waypoint. I realised that this might be something to do with the altitude settings - that it would like to be at 50m, but that it could not get there, because the climb rate was too slow. (I had seen complaints of this on various forums). At this stage, I probably should have landed it and reprogrammed it with lower-altitude waypoints, but I was wary of being too close to the trees. Instead, I increased throttle to move it to 50m. It then moved to the next waypoint, but again hovered for ~ten seconds or so without moving, rather than the expected five. I assumed I was again too low, and increased altitude, but the 'copter did not execute the next waypoint. I realised in retrospect that I had probably gone too high, and again it was waiting to get to 50m before it could execute the next waypoint.

I decided at this point to abort the flight and return it to the secondary landing spot on the west end of the courtyard. I engaged PH/AH, reduced throttle, yawed around clockwise 360 to check responsivity, and began to bring the 'copter back toward the courtyard. At this point, one of the propellors flew loose, and the 'copter began to fly erratically. With PH/AH engaged, the 'copter was attempting to engage the motors in a way that it thought would keep it at constant altitude, but missing a motor, it began to descend, and also slew. For thirty seconds or so I fought this behaviour, until I realised what the problem was, and switched it to full manual mode. I then yawed it so that its back end was facing me again, and brought it back to the courtyard, and landed it again. However I was rather anxious at this point (I had nearly lost it!) and the landing was not perfect, so one of the stressed carbon struts finally broke loose.
Flight end: 11.58am

Lessons

  • I didn't manage to thoroughly test the functionality I wanted to test - i.e. pointing in different cardinal directions while moving - because the very first heading I used, 00, caused the kopter to point at POI. I will try 360 next time, and perhaps 01.
  • Altitude control is tough, and if the 'copter needs to be within a certain altitude in order to execute the next waypoint, then it's crucial to either
    • get better at using the MX-20 transmitter display so I can read and adjust the altitude quickly
    • use a lower altitude so I can more easily see whether it is too high or too low - at previously tested altitudes of 10--30m I had none of these problems
    • figure out how to get the 'copter to completely control its own altitude - in the firmware documentation there is a good discussion of this
  • Slewing clockwise may be a particularly bad idea and cause propellers to come loose - always slew anticlockwise.
  • A pre-flight-check needs to be designed and more carefully attended to.
  • Bring lots of spares - and investigate the issue with the struts.

Wednesday 1 February 2012

50m Flight Test

Plan
In anticipation of the site visit to MRO, which may involve aerial photography of the Australian SKA Pathfinder dishes, I wanted to get a feel for flying at a higher altitude than I had tried before. Since it's better to do this in baby steps, I set a course for half of the legal altitude - a couple of way points at 50m. To try not to change anything from previous waypointed runs, I generated a rough rectangular flight path around the courtyard, focusing the camera on a POI about 10m west of where I was standing with the controller. I also hoped to compare the GPS log to the execute plan to see where the 'copter thought it was compared to where I told it to be.


Flight Log

I carried out two flights following the same waypoint pattern, because the video did not record the first time. Weather was fine, wind around 10 knots, NW.

Flight start: 14.41
Took off very smoothly, engaged Carefree, tested the controls, took it to altitude visually, and then engaged Waypoint mode. 'Copter yawed noticeably in order to focus on the POI, and then executed the waypoints. At one point, it flew along the same line-of-sight as the Sun, which made it difficult to see. Brought it down safely and found that the video hadn't recorded.
Flight end: 14.44

Flight start: 14.53
Again, smooth take-off, visually brought it to altitude, engaged Waypoint mode. The pattern executed was the same. Landing was again smooth and on target.
Flight end: 14.56

Struts are showing further signs of wear and one keeps coming loose no matter how gently I land!

Found on return to the lab that no GPS log had been made, as the microSD card claimed to be write-protected. I had previously used the same microSD card in the MX-20 transmitter so it's possible it had somehow corrupted the card. I eventually managed to reformat it in FAT(default) on Windows 7, and it seemed to read and write fine after that.

Lessons
  • Try not to program in a flight path that causes the 'copter to come within 5 degrees of the apparent Sun; any loss of control at that point would make the 'copter very difficult to recover.
  • Video camera switch needs to be firmly engaged in 'Record' mode.
  • MX-20 transmitter may be corrupting microSD card; be consistent with card in each device if I plan to log both.
  • 50m is really, really high.


Saturday 14 January 2012

GPS Logging

Having enabled the POI functionality, I wanted to properly log the GPS co-ordinates of the 'copter. I had another demonstration to perform to another group of NYSF students, so I figured I would try to get logging working and see if I could record anything. I didn't have time to do much before the demo at 11, so I just quickly popped it up in the air for them and then back down again:
The flight was between 11.08 and 11.09 am WST in the courtyard, and it was just a tad windier than yesterday. Unfortunately the POI was still too far to the south, so I was again not directly pointing at the group of kids!

After this I researched a bit more about how to log the GPS. I found that the MX-20 transmitter can perform logging, but more of the telemetry, like temperatures, control stick settings etc. It also produces very large files which have to be opened using a proprietary program from Graupner. I tested it out and it wasn't very user-friendly, mostly in German and with many dialogues and help boxes empty or containing filler text. As it can only log what it is sent by the 'copter, I realised it probably wouldn't help us with the main effort, to accurately measure the 'copter's position, any more than just recording directly. In the interests of completeness though, here is how you set up some auto-logging that begins when your flight starts:
  • Go to 'control switches'
  • Move the throttle joystick
  • Set the threshold to just past off, e.g. -88%
  • Go to 'timers'
  • Set that control switch as starting the 'Flt' (flight) time
If there's a micro-SD card in the transmitter, this will start logging when you bring the throttle up after starting the engines. Unfortunately it currently won't stop until you turn the transmitter off.

To log on the 'copter, it's a lot easier - just put a micro-SD card in the Navi-Ctrl board. 2GB is more than enough space as it generates very small files. It creates both a GPX file and a KML file: The KML file has  simple entries like
+115.8894829,-32.0038644, 1.789
showing the longitude, latitude and altitude, and it logs these every second.

The GPX files show a lot more data: 34 different data objects like roll angle and heading, and more information on the 'copter status, like available motor power and the motor temperatures. These points are logged every 2.5 seconds.

Now that I had a way of logging the position of the 'copter, I wanted to try a flight path that resembled the a possible flight plan for the MWA tile measurement: a curved flight with varying altitude, so as to eliminate the effect of taking a straight cut through a spherical beam. I came up with a simple series of waypoints using a sin curve, since I didn't need to be exact, just test the functionality.


When we were in the field, I uploaded the POI as the first waypoint, as I wanted to fly the 'copter over to its exact start position and land it there. I left the POI in the file, a mistake!

Flight start 16:33
I started the 'copter in CF mode and took it to 10m, then engaged 'come home' to send it to the POI. It reached it, but then behaviour I had not accounted for kicked in. Hovering directly over the POI, the 'copter was straining to tilt the camera mount at the point directly beneath it, and was slewing around in a clockwise arc trying to get to an impossible angle. The landing gear was also disrupting the servos on the camera mount. I immediately put it in PH/AH and began to land it, but it was difficult as the 'copter continued to slew around. I had seen warnings about this on the forums, but I didn't realise that it would be so difficult to control. After a few clockwise turns it lost a propeller! I brought it down and we managed to find both the prop and the washer, but lost the nut holding the propeller on. I realised afterward that I should have turned off CF mode, as then the 'copter would not have been trying to point at the POI, since that functionality is then disabled.
Flight end 16:34

Flight start 16:53
Having lost one propeller, I still hoped to see if the curved waypoints would work, so we brought the 'copter back to around 10m east of WP2, and deleted WP1 from the log. I brought it up and started the waypoints, but the 'copter rose poorly and slewed around, spending a lot of time trying to get to each waypoint even though I had told it to spend zero seconds at each one. After a minute I brought it down again, as it was clear it was not going to be a good test of the functionality.
Flight end 16:34

I looked at the logs and they were difficult to understand at-a-glance. I tried putting them into Google Earth but it runs very slowly on my computer and GE's handling of altitude is terrible. Then I found this excellent little online app: http://www.gpsvisualizer.com/ which can produce a nice png of each flight, or transform it into files for use in other programs.
Clockwise spirals while hovering directly over POI.

Poorly-executed curved flight path - missing a propeller.
Lessons:
  • Never hover directly over a POI; the 'copter becomes extremely erratic as it tries to get the camera pointing directly at it. If you do accidentally end up doing this, turn off CF mode, turn on PH/AH and land immediately, then reprogram.
  • Flying manually is ok with seven propellers, and it can execute simple waypoints, but it can't make fine adjustments well enough to perform a densely-waypointed flight path.
  • The propellers have a tendency to come loose when you yaw clockwise - probably due to the unreversed threads on half of the motors.

Friday 13 January 2012

Carefree and Point-of-Interest

After some research online, I found the issue that was preventing our 'copter from yawing to point and tilt the camera at a point-of-interest while executing waypoints. According to the mikrokopter website, Carefree mode must be enabled to use POI mode. This is a safety feature, because after you have finished executing a series of waypoints, it is tricky to see the orientation of the 'copter. In Carefree mode, the 'copter knows where you are when you started it up, and it works out the angle between you and it. It then assigns whichever direction lies away from you as its nose, so that if you tilt it right, it moves (apparently to you) right, left left, and so on. Thus if it is far away at the end of the execution, or something goes wrong in the meantime, you can simply tilt the control joystick toward you, and it will fly back toward you, without worrying about where its real 'nose' is pointing.

As it happened, I had a convenient moment to test this functionality, as a group of National Youth Science Forum students are visiting Curtin / ICRAR, and I've been asked to demonstrate the 'copter to them. They will be visiting the courtyard behind my building, so I had a quick look and saw a convenient grassy space they could sit in, while I used the larger area to fly.
I readied the transmitter and 'copter and programmed in the POI, -31.99447 lat, 115.88896 long. I pointed it toward the POI to start with, so that it was reversed controls compared to how one usually flies. I wasn't sure what would happen if I started with Carefree enabled, so I throttled up with it disabled. However I found the reversed controls so confusing that I immediately landed again, and decided to try with Carefree enabled from the start. I re-uploaded the POI, turned on the camera, and switched the CF switch on the transmitter to the 'on' position. This time the controls were not reversed, although it was very strange to be flying with all of the reflective lights and tape no longer relevant. I brought up the 'copter and took it a bit toward the crowd - who unfortunately were sitting in the shade, approximately where the green arrow is, rather than at the POI I expected! (show picture) After a minute or so of hovering, and gently moving it around, I took the 'copter back to its landing point, brought it down and took questions from the students. When we looked at the video, the POI tilt had worked well - although it would have been nice to have the people centred in the image.


Lessons
  1. It's a good idea to start with CF enabled if you do not have the nose facing away - and it works absolutely fine.
  2. Enabling CF does enable POI functionality.