There's been some good news and some bad news: the bad is that I have not had and will continue not to have enough time to work alone on the oktokopter project, and the good is that a team of robotics students and engineers at Arizona State University have volunteered to continue the work. We are shipping the 'kopter overseas, disassembled so as to pack well for the trip. To help the ASU team (and anyone in future working on this project!) here's an overview of how to put the 'kopter back together.
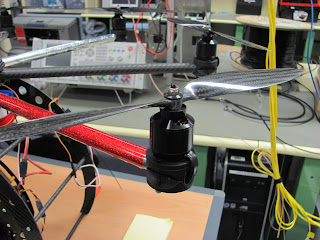
Remove the propellers: use an 8mm hexagonal spanner to undo the self-locking nuts. There is a black washer between each nut and propeller.

Remove the propellers: use an 8mm hexagonal spanner to undo the self-locking nuts. There is a black washer between each nut and propeller.
Note that the propellers are on in alternating clockwise and clockwise configurations: the red (port) spar is shown below with the correct propeller so you can put them back on correctly. If you get them all wrong, the copter won't take off, but push itself into the ground!
After removing the clear plastic hood and putting the cottle pins somewhere safe, undo all of the black bolts with an allen key or ball screw, holding on to the 3.5mm nut at the bottom each time with either your fingers or a small spanner. (These bolts hold the strut saddles in place around the frame.) Put the black bolts and nuts together in once place.
Undo the silver bolts: these not only hold half of a strut saddle each, but also hold the platform onto the landing gear frame. As such they are slightly longer than the black bolts.
This is a view of the connection between the platform at the landing gear, before disassembly. Note that the platform touches the clear plastic frame directly, and then the load is distributed with a carbon fibre insert. This falls out when the silver bolts are removed.
After the platform is removed, the struts can be rotated around so that the starboard and port struts join the front struts, and the remaining struts fold back with the rear struts.
All the cables connecting the landing gear to the platform have to be disconnected so here is a photo record of the connections:
 |
 |
| We have since extended the camera mount lead since the one that came with the 'kopter was not long enough. |


No comments:
Post a Comment